Quick Start
Overview
This chapter provides a quick guide to using the NG4500 series products.
Hardware-related
-
Hardware Overview: For details, refer to the Hardware Component Description
-
Device Assembly: For instructions, see the Hardware Connection Guide.
Software-related
- Environment Setup: For setting up the software development environment, refer to Development Environment Setup.
- Firmware Flashing: For detailed steps on firmware flashing, see System Firmware Flashing and Initialization.
Initial System Startup Configuration
Refer to the above content, complete the hardware connection, power to NG4500, according to the following prompts to complete the system's first initial configuration.
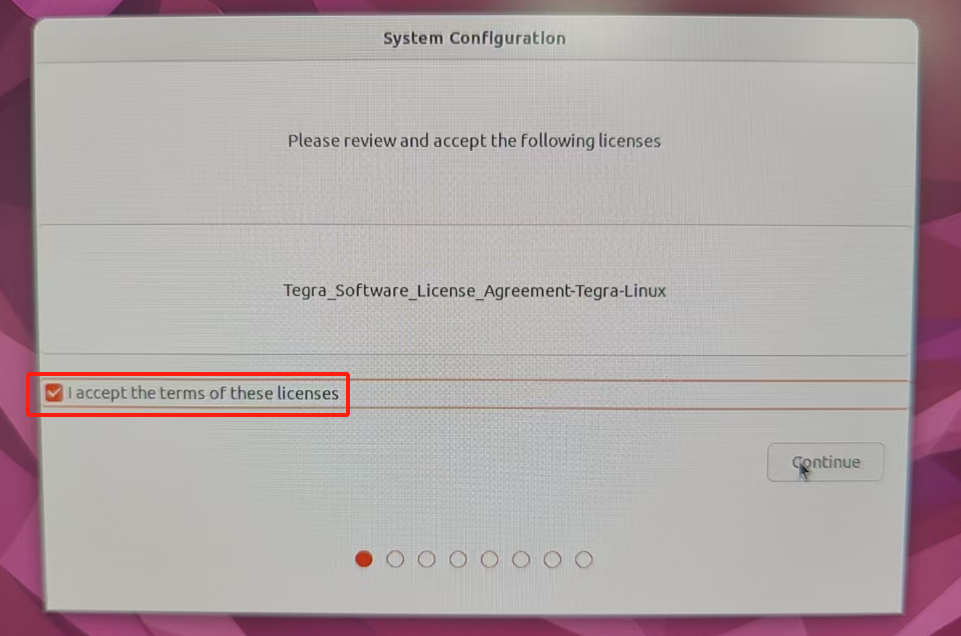
1. User Configuration
- Check
accept licenseand continue.
- Set the language and continue.

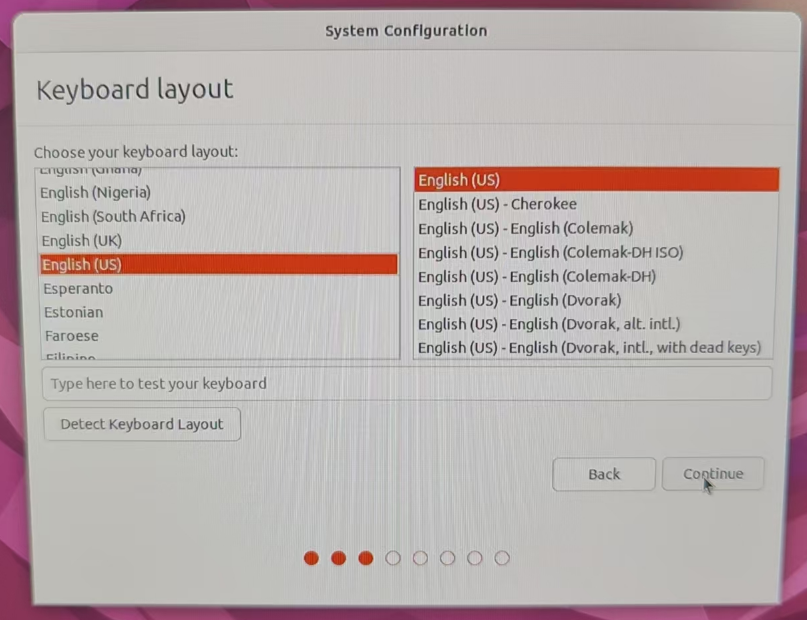
- Configure the keyboard layout and continue.
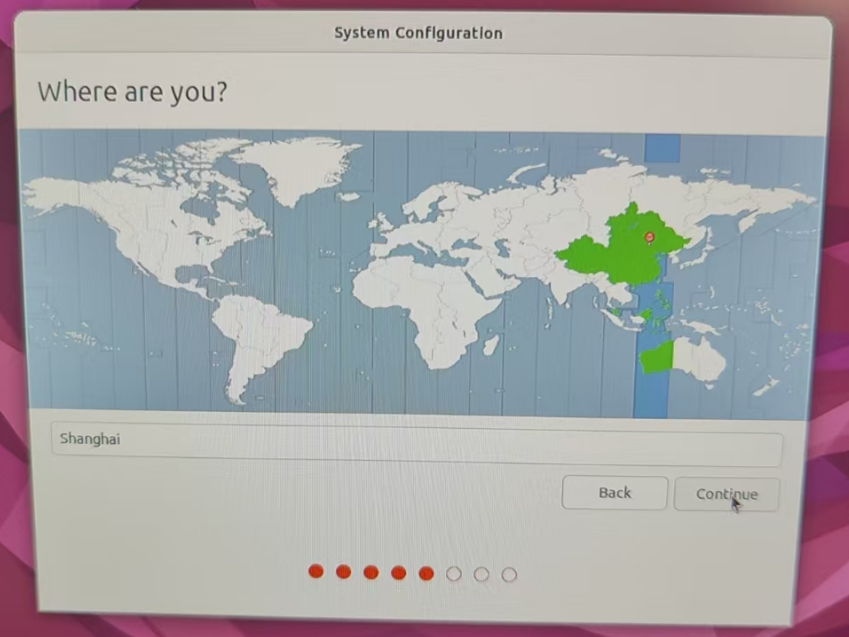
- Set the timezone (e.g.,
Asia/Shanghai) and continue.
- Configure 'Your name' and 'password', then continue.
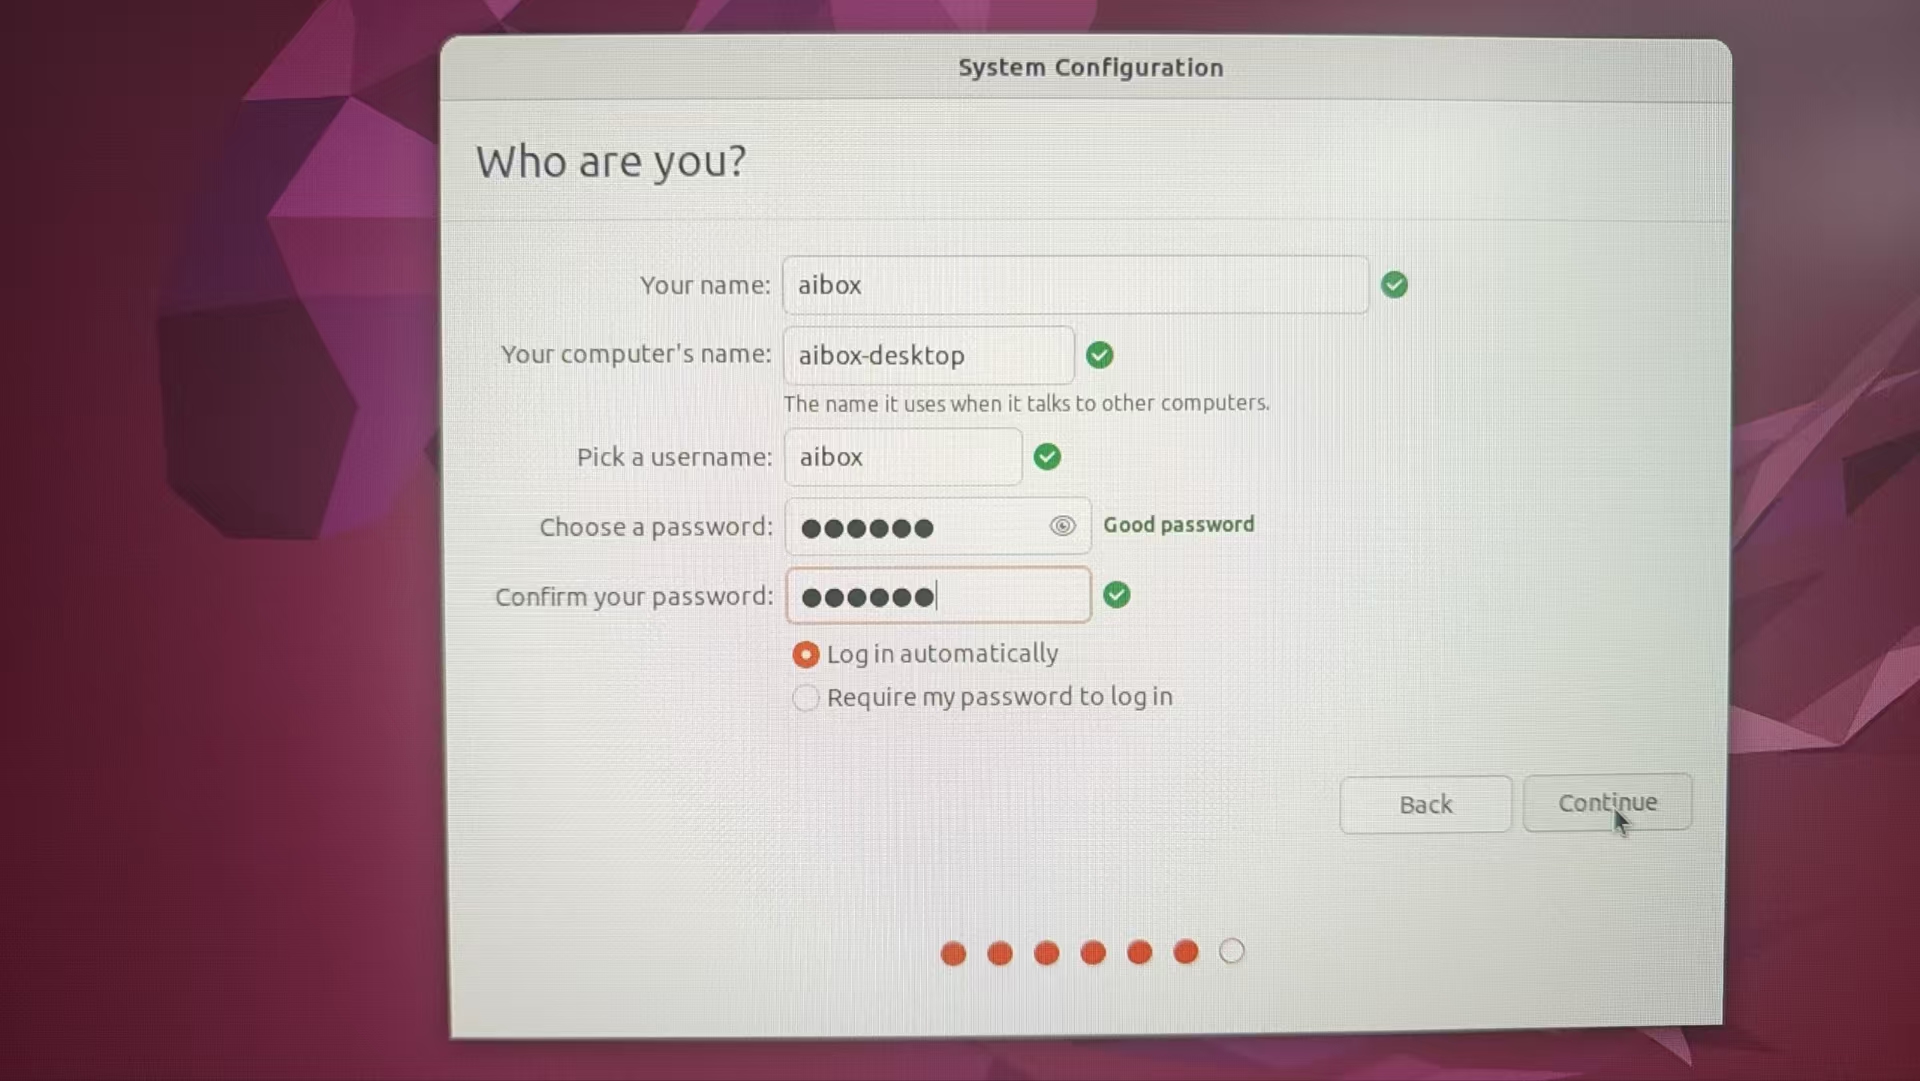
- Finally, wait for the system installation to complete and restart automatically.
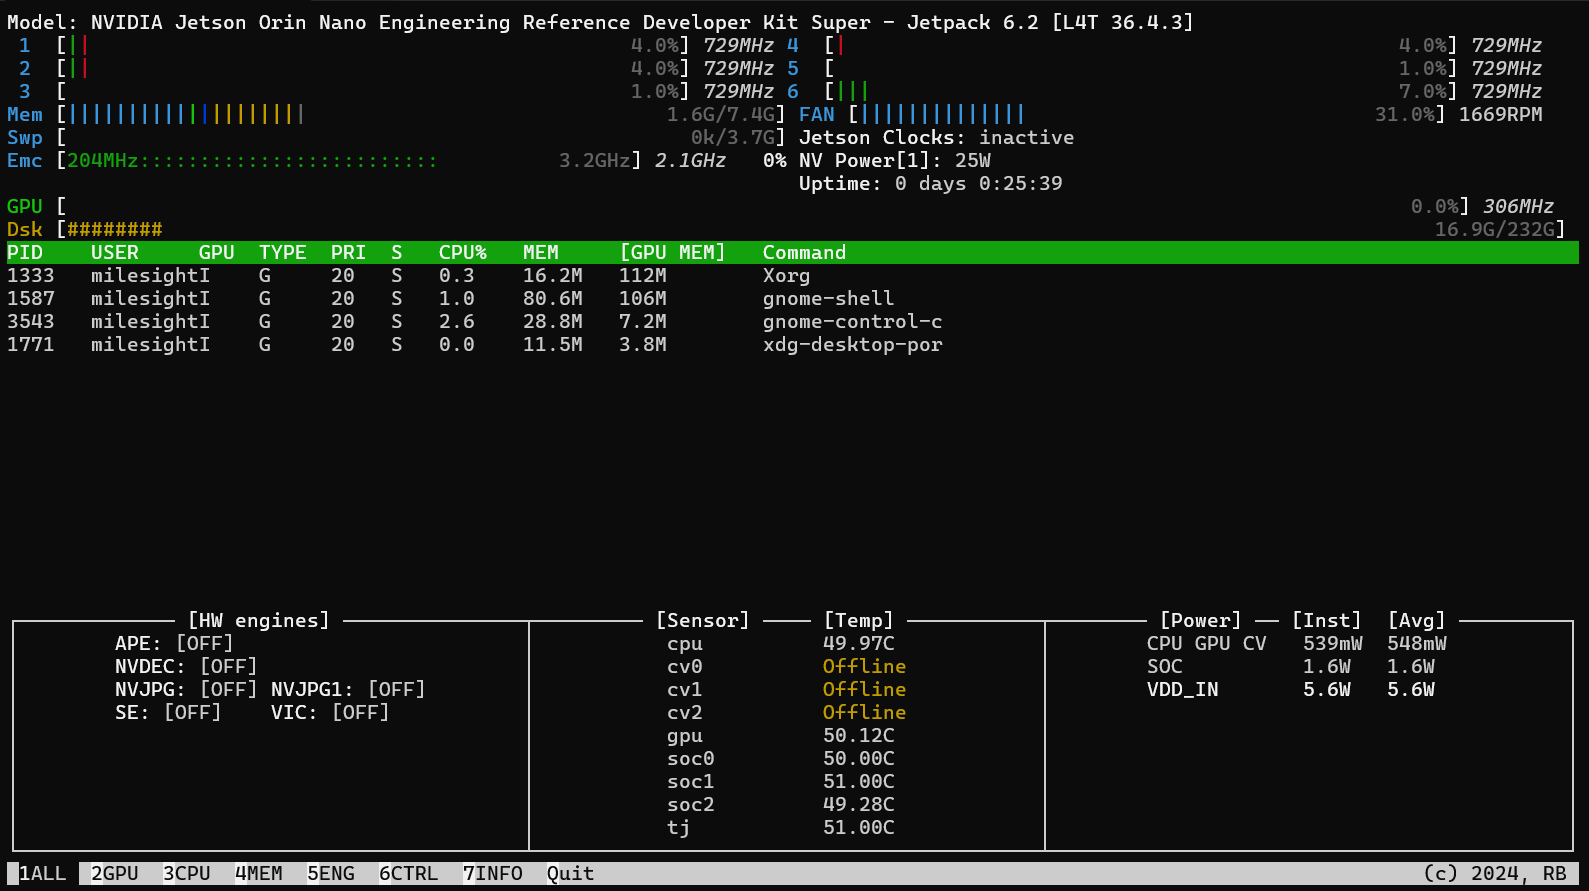
2. System Status & Version Confirmation
-
Use the Jtop tool to monitor system resources:
# Install Jtop
sudo apt update
sudo apt install python3-pip
sudo pip3 install -U jetson-stats

# Restart the service
sudo systemctl restart jtop.service

# Run Jtop
sudo jtop
This will display real-time resource usage, including CPU, memory, GPU, disk, and fan status.And confirm the current system is installed TensorRT, CUDA version.
Model Deployment
The following will introduce how to deploy and run the NanoOWL real - time visual inference model on the AIBOX. Taking NG4511 as an example, an imx219 camera is used.
Hardware Requirements
| Component | Requirement |
|---|---|
| Device | Jetson Orin(Nano / NX / AGX) |
| Memory | ≥ 8GB (Larger models require more memory) |
| Storage Space | ≥ 10GB (Depending on the model size) |
| GPU | NVIDIA GPU supporting CUDA |
Software Environment
- JetPack Version:
- JetPack 5 (L4T r35.x)
- JetPack 6 (L4T r36.x) (Default version of the system)
Environment Preparation
-
Hardware connection: Connect the IMX219 camera (Note: The metal contacts should face upwards).
-
Install dependencies
sudo apt update
sudo apt-get install -y docker.io
sudo apt-get install -y nvidia-container-toolkit
sudo apt-get install nvidia-jetpack
- Install jetson - containers
# Get the source code
git clone https://github.com/dusty-nv/jetson-containers

# Install dependencies
bash jetson-containers/install.sh
- Start the deployment and automatically pull/build the nanoowl container. (Note: After obtaining the container, the container will be started)
cd jetson-containers/
jetson-containers run --workdir /opt/nanoowl $(autotag nanoowl)
This command will automatically detect your hardware configuration and pull or build the appropriate container image.
Running Example
- Check the camera device
ls /dev/video*
-
Run the nanoowl container and complete the following configurations
- Start the docker and enter the test case path
cd jetson-containers/
jetson-containers run --workdir /opt/nanoowl $(autotag nanoowl)

# Enter the test case path
cd /opt/nanoowl/examples/tree_demo- Install dependencies
apt update
apt-get install vim
pip install aiohttp- Modify the
/opt/nanoowl/examples/tree_demofile
# Comment out the following line of code
camera = cv2.VideoCapture(CAMERA_DEVICE)

# Replace it with the following content
gst_pipeline = (
    "nvarguscamerasrc ! "
    "video/x-raw(memory:NVMM), width=(int)1280, height=(int)720, format=(string)NV12, framerate=(fraction)30/1 ! "
    "nvvidconv ! "
    "video/x-raw, format=(string)BGRx ! "
    "videoconvert ! "
    "video/x-raw, format=(string)BGR ! "
    "appsink"
)
camera = cv2.VideoCapture(gst_pipeline, cv2.CAP_GSTREAMER) -
Start the terminal and run the test case
python3 tree_demo.py --camera 0 --resolution 1920x1080 ../../data/owl_image_encoder_patch32.engine -
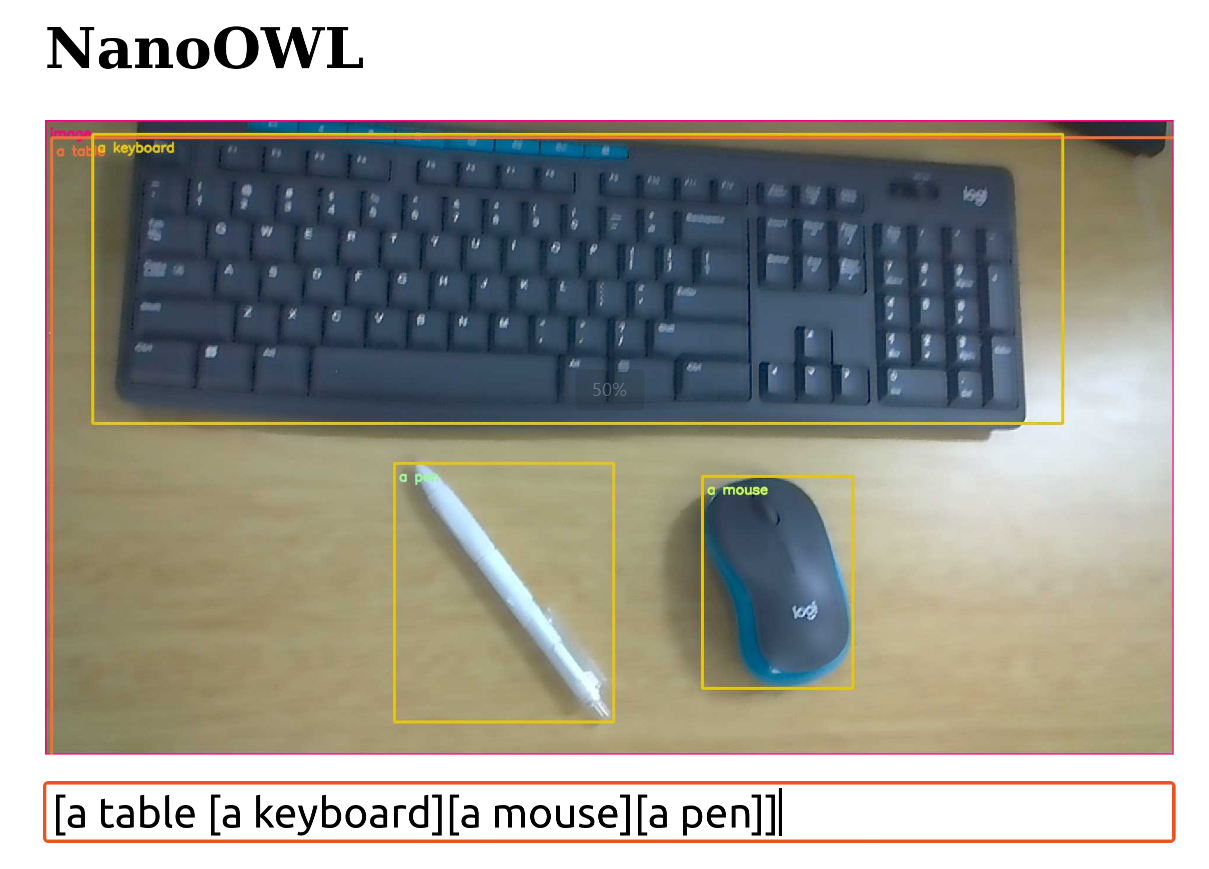
Results
- Open the browser and enter the IP address of the current NG4511 device, such as
http://<ip address>:7860. - Enter any content you want to recognize, such as
- [a face [a nose, an eye, a mouth]]
- [a table [a keyboard, a pen, a mouse]]
- Open the browser and enter the IP address of the current NG4511 device, such as